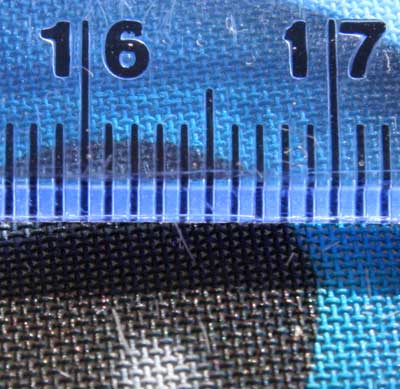
This tutorial covers the construction of the metal mesh eyes as used in my husky fursuit Kibble. The picture (right) shows the fine mesh used (the ruler marked in millimeters; one millimeter is very roughly 1/32nd of an inch), that allows good vision while obscuring the wearer's eyes. The white bristles are actually fine faux-fur fibres.
As described the technique involves some careful soldering, and some skill is required. It shouldn't be your first soldering project! An alternative approach may be to use a strong epoxy resin glue (such as Areldite) to fix the mesh to the wire rim - this still needs to be tested.
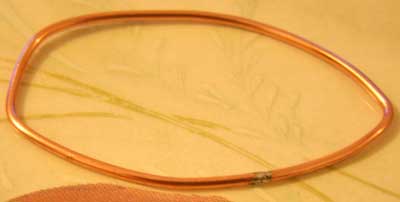
The outer rim of the eye is made from solid copper wire with a cross-sectional area of 2.5mm2. This is commonly used in wiring to electrical sockets in Europe, and can be stripped out of Twin-And-Earth cables from a DIY store. This is roughly equivalent to 13 AWG, but it is not a critical dimension, the wire needs to be stiff but malleable. Strip off all the insulation. The surface of the copper should be bright and shiny, if it is not you may have trouble soldering it later.
Form the wire into the eye hole as needed, use the pliers or fingers to bend it as needed. The form need not be two dimensional. Most eyes will be curved. Spend some time getting this step right, and making sure the eyes match each other. Finally adjust the size and cut the wire to length at an angle.
Solder the ends of the wire together. It helps to rest it on a heat proof surface, or hold it in a clamp. The copper wire conducts heat readily from the soldering iron to your fingers!
The copper mesh used is 40 mesh which means there are 40 threads per inch in each direction, and normally the gaps between threads are as wide as the wires (so each wire is 1/80th of and inch wide). If you use a finer mesh you may find that the holes clog up to easily when painting (by the time you get to 200 or 400 mesh you begin to see interesting diffraction effects too). Copper is used because it's easy to solder. Other metals can be used if you are familiar with soldering them.
Lay the eye form on the mesh and draw around it with the permanent marker. You need to allow a few millimeters around the outside of the eye shape to fold the mesh around the wire. Cut the shape out with scissors (not your best fabric or kitchen scissors). Take care not to get any of the fine copper trimmings where they might be painful later.
This is probably one of the trickiest steps, and I wouldn't recommend it if you are not comfortable with soldering.
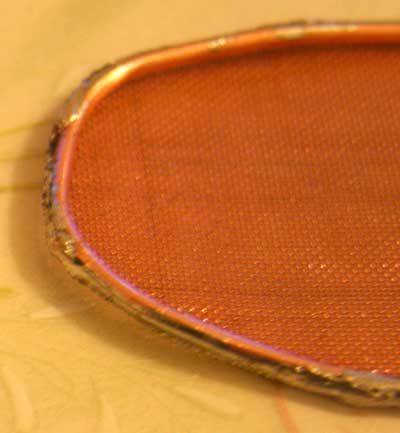
Begin by folding one end of the mesh over the wire rim and tacking it onto the outside edge. Repeat the process at the opposite end of the eye, ensuring the mesh is taught. Repeat the process at several other points around the edge. Avoid getting solder (or flux) on the front or back of the eye. Also avoid soldering near the join in the wire rim - it will spring open.
Once the mesh is tacked in place, curve the edges of the mesh around the wire rim (use the handle of the teaspoon), trim to length, and solder down. Finally work on the part near the join in the rim. With the mesh holding the rim in place it should not spring apart as this joint is re-heated.
The copper mesh is still malleable and can be formed into a curved surface by working it with a suitable tool. I've done this by holding the eye in my cupped palm and rubbing it with the bowl of the teaspoon. It takes a little time, but results in a better look and a stronger eye.
It's critical that the surface of the eye is clean before you paint it. Right now it will be covered in flux droplets and grease from handling.
I use Flash all-purpose household cleaner and an old (but clean) toothbrush to scrub the flux residue off the mesh. You may want to experiment with other cleaners available locally. Afterwards I rinse the mesh well with clean water, and then clean with Methylated Spirits or Alcohol. Avoid drying the mesh with anything that will shed fibres; these will cause blockages while painting.
Painting the mesh works best when it is positioned without a solid surface directly behind it. If you don't do this the holes in the mesh will tend to become blocked with paint. I've used a simple platform made of spare wire to support the mesh, but the best option is going to depend on your painting environment. Since spray paints are used you will want to consider using a spray booth, respirator, and working outside.
White car primer adheres well to the clean wire mesh, and provides a good surface for the top coat. Apply three thin coats and cover both sides of the mesh. Allow to dry thoroughly.
Fit the eyes into the head temporarily and work out where the centre of each pupil will need to be. Mark this spot with a light pencil mark. Getting this position correct is particularly important with more realistic eyes. Since you can see through the white of the eyes, the character's pupils need not line up with your own.
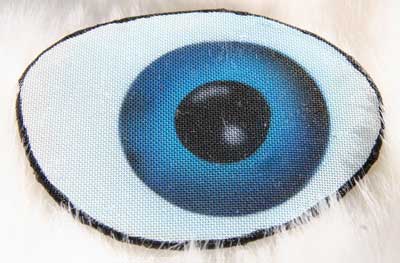
Airbrush on the eye design you need using Liquitex paints. How you do this will depend on the design you have in mind and your comfort with different airbrush techniques. Using stencils with circular holes for the pupil and iris can be very helpful. You may want to paint the white of the eye with Liquitex white as this will be noticeably whiter than the white primer. Add highlights and shadows as required.
Finally apply two or three light coats of Liquitex gloss clear coat, diluted to suit your airbrush. Once this has properly dried the eyes should be reasonably resistant to damage. One notable exception is if you allow the eyes to rub against one another prior to fixing in the head.
How you fit the eyes to your head will depend on the construction of your head, but hot glue will work well for most conditions.